In this lesson we are going to add the sashing and borders to all the blocks
we made. Sashing will help keep the blocks from competing with each other and
will unify the quilt top. Borders frame the blocks and sashing. You will also
learn how to add temporary borders to aid in quilting the borders. So lets get
started shall we?
ADDING SASHING
Seam allowances have been included in these measurements for the sashing. If
your hand piecing mark ¼ from the edge on both sides. When adding the sashing
strips to blocks, pin strip to block ends, then ease in any fullness while
pinning remainder of edge. This makes the block fit the strip and should prevent
wavy strips. When sewing, match right sides together and raw edges using a ¼
seam allowance. Press seam allowance towards the sashing after each strip has
been added.
Step 1. Cut fifteen 12 ½" strips from 100" strip.
Step 2. Sew three strips between blocks indicated (figure A) to make Row
1. repeat to make rows 2-5.

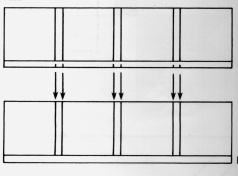
Step 3. Matching short edges, fold one 56" strip in half; mark
center of raw edges. Pin center of strip to center of bottom edge of row 1. Pin
ends of strip to row one. Easing in any fullness, pin pieces together between
ends. Sew strip in place (figure B) Repeat to rows 2-4.

Step 4. Lay row 1 on a flat surface. Place a ruler along seam line of
sashing between blocks. Mark long sashing strip directly across from seam line.
Repeat to mark sashing strip for remainder seam lines. (Figure C)

Step 5. Match seam lines between blocks on row 2 with marks on sashing
strip (figure D) Pin and sew in place, easing any fullness between marks.

Step 6. Repeat steps 4-5 to add rows 3-5. (figure E)

ADDING MITERED BORDERS
Seam allowances have been added to these measurements. Note: if hand piecing,
mark a ¼" seam allowance on both edges. The border lengths include several
extra inches for "insurance", do not trim extra length till the
corners have been mitered. When sewing, match right sides together and raw
edges, use a ¼" seam allowance.
Step 1. Sew one narrow 90" inner border strip to one wide 90"
outer border strip; press seam to one side. Repeat with remaining 90"
border strips.
Step 2. Sew one narrow 104" inner border strip to one wide 104"
outer border strip; press seam to one side. Repeat with remaining 90"
border strips. Note: strips combined in steps one and two will now be thought of
as 1 border strip for remainder of instructions. When attaching to the quilt
top, pin and sew into placing along raw edges of inner border strip to edge of
quilt top.
Step 3. Matching short edges, fold one 90" border strip in half;
mark center of raw edge. Pin center of border strip to top center of quilt top.
From center of border strip, measure out 28" (which is ½ the width of the
quilt top) in both directions and mark. Match marks on border strip with ends of
quilt top and pin. Easing in any fullness, pin border strip to quilt top between
center and corners.
Step 4. Sew border strip to quilt top beginning and ending exactly ¼"
from each corner of quilt top. Backstitch at beginning and end to secure. Do NOT
sew seam allowance

Step 5. Repeat steps 3 and 4 to sew remaining 90" border strip in
place at bottom of the quilt top.
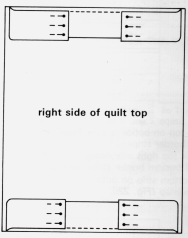
Step 6. To temporarily move top and bottom border strips out of the way,
fold ends of strip and pin as shown

Step 7. Matching short edges, fold one 104" border strip in half;
mark center of raw edge. Pin center of border strip to top center of quilt top.
From center of border strip, measure out 35" (which is ½ the width of the
quilt top) in both directions and mark. Match marks on border strip with ends of
quilt top and pin. Easing in any fullness, pin border strip to quilt top between
center and corners.
Step 8. Sew border strip to quilt top beginning and ending exactly ¼"
from each corner of quilt top. Backstitch at beginning and end of stitching line
to secure. Do NOT sew seam allowance. Note: stitching should begin and end at
ends of previous stitching line.

Step 9. Repeat steps 7 and 8 to sew remaining 104" border strip to
quilt top on opposite side. Press seam towards border strips.
Step 10. Lay quilt top right side down on a flat surface. Overlap top and
bottom border strips over side strips.
Step 11. Mark bottom strip on outer edge at the point where strips
overlap.

Step 12. Matching right sides and raw edges bring strips together with
marked strip on top. Use ruler to draw a line from the mark on the outer edge of
strip to the end of stitching line.

Step 13. Pin strips together along drawn line, making sure seams of
narrow and wide border match. Sew directly on drawn line, backstitching at
beginning and end of stitching.

Step 14. Turn mitered corner right side up. Check to see that there is
not a gap at the inner end of seam. Also check that the border seams match and
that corner does not pucker. If necessary, use a seam ripper to remove seam and
pin and sew again.
Step 15. Trim seam allowance to ¼". Press seam allowances to one
side.

Step 16. Repeat steps 11-15 to miter each remaining corner.
ATTACHING TEMPORARY
BORDERS
Quilting the borders of a quilt can be awkward or difficult because they
cannot be held securely in a hoop. To aid in quilting the borders, you may wish
to add a temporary strip of fabric to the border. These strips are not quilted.
They are basted to the outer edge of the quilt top and are removed when quilting
is completed.
Cut two 5"x93" strips of fabric (Note: these strips may be pieced
if necessary) using a 1/8" seam allowance, baste strips to the sides of the
quilt top. Cut two 5x78 ½" strips of fabric. Baste strips to the top and
bottom
